Of course there continues to be another world to the left of that closet entrance - but it truly is amazing (read...sad/pathetic) how much room is discovered when you organize and tidy a few years of neglected accumulation!
Showing posts with label Before/After. Show all posts
September 23, 2012
Sewing/Craft Closet
After cleaning out the clutter, painting the walls and the back of the closet door (because well, when I painted the front of the door two years ago I was MUCH too busy to do the back), installing two new shelves, sorting and organizing my whole little bin system, putting up a ribbon dowel, repurposing an old magazine rack for wrapping paper and putting in my corkboard - I am happily content with phase one of the craft/sewing closet. Phase two of course being blowing out the back of the closet and extending it through to overtake the entire playroom/family room behind it. Naturally.
I wanted the shelves to look a little chunkier so Aaron faced the melamine shelves with MDF. I found the blue damask canvas bins as Wal-Mart and thought they would look great in there and be good for housing all batting and flannel as they are bulkier and don't compact as well in the drawers. The larger bin on the fabric tower is for projects 'in process' - which is a too common reality when I try to find 'uninterrupted' sewing/crafting moments. And I know that the truth is if I don't build in for this occurrence, the leaning tower of half-done projects will be back in a matter of weeks! :)
May 23, 2011
Yard Progress II
So once again...
And I could not be more excited to be lookin' at this now....
I built three little cedar planter boxes and stained them to match our fence. We're going to use the first two for a few vegetables and the last one is the long anticipated sandbox! Nothing fancy or elaborate but open space and well worth the investment and efforts to finally have a place for the kids to run and play and dig!
January 28, 2011
Fireplace Re-Surround
So, the previous owners of our house, ...they built a fireplace surround for the electric insert and, well....
'nuff said. Yes. That's actually wallpaper. AMAZING.
So, be it that we can't afford to replace it at this time and we like having the extra heat for the basement - this is my quest to prettify it.
Since the wallpaper revealed a mixture of odd lumbar, drywall, and panelling - they obviously had "wallpapering" in mind - none of the sides were flat. So, I boxed it in with some MDF for a little more interest and put solid plywood panels on the side so it was paintable. I then primed the sides and front columns.
And my amazing husband laid ceramic tile around the insert.
The top had had been tiled and trimmed with wood baseboards. Mmmmm.
So - we put a new top on it and just painted out the insert with black flat paint. and now...
and this is where I'm stuck. it looks deceiving finished from the front but the moulding is just currently tacked...cause,....turns out....I SUCK at cutting crown moulding. thus, the sides don't line up with the front - which incidentally was cut too short - ummm,... twice - and thus is remains the view from the sides. SO SAD.... :(
so - back to the store for yet another six foot piece of moulding - happy I picked the cheap stuff..... :)
November 19, 2010
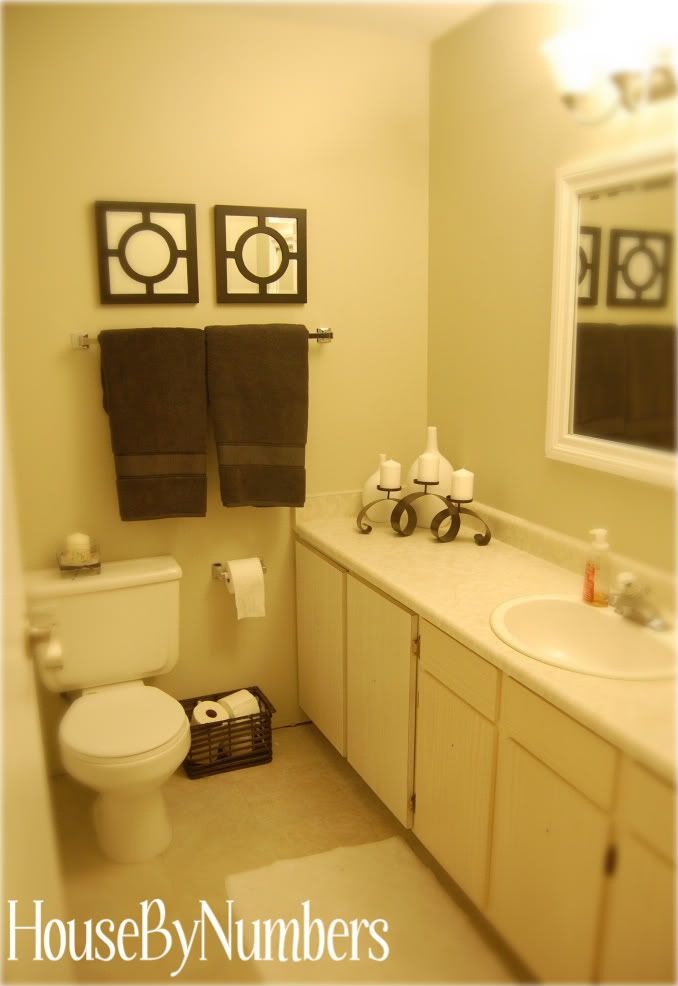
Bathroom Update on the Cheap.
So , it remains in our plans to properly renovate our main bathroom - with a new vanity, flooring and mirror - but that's looking like a year away at this point, and I wasn't content looking at this....
It was one of the only rooms that hasn't been painted since we moved in and one of the two left with patchy canary yellow walls and door. - k, please don't paint your doors canary yellow. ever. it doesn't have the "sunshiney" effect you would think at seven in the morning....
So - some left over paint (FREE), some new towels ($30), a toilet paper holder ($10), two small mirrors ($15 each) - and some moulding for around the mirror ($12) - a grand total of $82 and I I am MUCH calmer in the morning! :) We did also replace the lighting fixture a few weeks after we moved in - although now I'm not sure why we EVER elected to get rid of the brass hollywood dazzle strip! :) I do have a new faucet that still needs to be installed, I'm going to paint out the vanity doors white, and I need some more artish filler for beside the big mirror (taking suggestions for that please!) - but it think it's largely improved.
So, please....help me fill the wall space??
October 8, 2010
Polka-Dot Sit Down
Here's another before and after find from the local auction....$3.75 for the chair...$40 for the fabric. AMAZING find as the wood finishing was in amazing condition. The upholstery however had a few mystery stains (no thank-you) and a rip in the back - some pilling and wear...not so pretty.
After...
But I am LOVING the polka dots and simple lines of the chair. I have another coordinating fabric and chair that is also on the to-do list that I think will look great with this one. Mmmmm. :) Yes - I MAY be developing an addiction to trashy chairs....but when do you NOT need something to sit on??
October 6, 2010
Master Ensuite Progress
So - It's seems a little redundant to say that this room is not done - as I have yet to finish ANY room in our house,...but it's a little progress and if I waited to show you my house until it was done...well,...we would have very little to talk about. :) Again - with the attention span of a gnat and the money of a....umm....a person with no money...(nice save.), I was able to focus long enough to paint the room - but do little else. baby steps! :)
So - here's the progress.
Before
After
But - off to chase something shiny..... :) Have a great day!
Ralna
So - here's the progress.
Before
![]() |
| Apparently these were taken before I learned how to turn on the autofocus. Sorry.... |
| Yeah - the seashell is still there... Sadly, I don't notice it anymore so my motivation to change it has been distracted... |
| The stripes show up more in person - but they are still pretty subtle. LOVE LOVE LOVE them!! :) |
| Next time as a special treat - maybe I'll even take the four seconds to fold the towel... probably won't make the bed in the background though! :) |
But - off to chase something shiny..... :) Have a great day!
Ralna
October 2, 2010
Finished Craigslist Find
I finally bit the bullet and dug out the sandpaper today. I gotta say - I was SERIOUSLY chicken! But I think it was a definite improvement and brings out the detail in the carved arms. My first actual attempt at "weathering" with the paint layering, sanding, and I finished it with a super light stain wash on and off - which totally changed the look as well and I think matched it to the fabric even more! Tried not to stress too much about it being perfect and "symmetrically" and evenly distressed - silence the OCD part of myself - because I guess that is technically the whole point of distressing - to make it look old and naturally "UN-perfect". But it's hard...there's still the sick little part of me inside that wants to go back and match ever "wear" with an equally worn mirror reflection on the other side. I need help don't I?
And because it's always fun to do a good before and after....
Have a great night...
Ralna
And because it's always fun to do a good before and after....
Have a great night...
Ralna
Subscribe to:
Posts (Atom)